
olly - Fotolia
Adding an additional virtual bridge to a KVM environment
Virtualization expert Sander Van Vugt offers tips to simplify the process of adding a second software bridge to your KVM environment to run VMs in an isolated SDN.

A software bridge is an essential element of any kernel-based virtual machine environment. This software bridge works like an Ethernet switch, connecting virtual machines to external network interfaces. In this article, we'll take an in-depth look at more of its options.
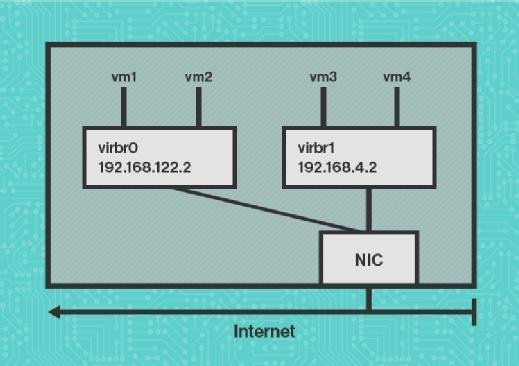
After installing a Kernel-based Virtual Machine and some VMs, you'll work with a configuration in which the virtual bridge connects to the physical network card, and all VMs connect to the virtual bridge. The IP addresses in the virtual network will be used internally -- meaning they aren't visible to any computer outside of the KVM host -- and the VMs will use Network Address Translation (NAT) as a default to connect to the Internet. While this works well in a simple setup, some configurations require a more advanced setup. To help get you started, I'll show you how to add a second virtual bridge to the same physical network interface, allowing you to run VMs in isolated software-defined networks. Refer to Figure 1 for an overview of this setup.
Defining the virtual bridge
To create a setup with different virtual bridges, you'll first need to define the second virtual bridge. These bridges are defined through XML files that are processed by the libvirtd daemon. The default virtual bridge is in "/etc/libvirt/qemu/networks/default.xml." The easiest way to add a second virtual bridge is to copy this file to a new XML file. Listed below are the contents of the virtual bridge definition file. After copying the file, you should edit it with the command virsh net-edit, followed by the name of the new file.
<network>
<name>vmnet4</name>
<uuid>f4f6fde8-03f6-4303-ae41-b4e03bd804d9</uuid>
<forward mode='nat' dev="eno1"/>
<bridge name='virbr1' stp='on' delay='5'/>
<mac address='52:54:00:c4:44:c2'/>
<ip address='192.168.4.2' netmask='255.255.255.0'>
<dhcp>
<range start='192.168.4.2' end='192.168.4.254'/>
</dhcp>
</ip>
</network>
You can find different elements when defining the virtual bridge, from the name -- which, obviously, has to be unique -- to a Universal Unique Identifier. If you've created the virtual bridge by copying an old file, don't forget to change the UUID, as well.
In the next line, you'll define the forwarding mode. While NAT is the default and most common mode, you can also use routing as the forwarding mode. In this article, I'll focus on NAT setup only. An important option in this line is dev="eno1", which identifies the network interface card eno1 as the network interface to which this virtual bridge should be attached. The remainder of the configuration is self-explanatory and indicates which IP address configuration to use.
After creating the virtual bridge, make sure you restart the libvirtd process, using systemctl restart libvirtd.
Connecting VMs to a bridge
To connect a VM to a newly defined virtual bridge, you'll need to edit its XML configuration file. The preferred way to do this is by using the virsh edit vmname command, in which vmname is the name of your VM, as shown with the virsh list command. In the VM configuration, look for the "<interface>" section, which is similar to what you see below.
<interface type='network'>
<mac address='52:54:00:46:eb:6f'/>
<source network='vmnet4'/>
<model type='virtio'/>
<address type='pci' domain='0x0000' bus='0x00' slot='0x03' function='0x0'/>
</interface>
The important section in the configuration file is the "<source network>" definition, in which you'll specify the name of the virtual bridge to which you want to connect. This name must correspond to the name that has been used in the virtual bridge definition. You can use the virsh net list command to verify the names of the virtual bridges currently available.
Verifying operations
After booting the VM with the new virtual bridge configuration, it will automatically connect to the new virtual bridge. You can verify this with the brctl show command, which will show output similar to the one shown below.
[root@lab networks]# brctl show
bridge name bridge id STP enabled interfaces
virbr0 8000.525400c56bc2 yes virbr0-nic
vnet0
vnet10
vnet11
vnet12
vnet13
vnet14
vnet4
vnet5
vnet6
vnet7
vnet8
vnet9
virbr1 8000.525400c444c2 yes virbr1-nic
vnet1
vnet2
vnet3
The most essential part of the brctl show output is the interfaces column. In this column, you'll see a VNET interface that has been added as a bridge port for every VM connected to the virtual bridge. As such, there is a network card like eth0 within the VM, which uses the vnet0 port to connect to the virbr0 bridge.