virtual machine (VM)
What is a virtual machine (VM)?
A virtual machine (VM) is an operating system (OS) or application environment installed on software that imitates dedicated hardware. The end user's experience when using a VM is equivalent to that of using dedicated hardware.
How do VMs work?
A VM provides an isolated environment for running its own OS and applications, independent from the underlying host system or other VMs on that host. A VM's OS, commonly referred to as the guest OS, can be the same as or different from the host OS and the OSes of other VMs on the host.
A single computer can host multiple VMs running different OSes and applications without affecting or interfering with each other. Although the VM is still dependent on the host's physical resources, those resources are virtualized and distributed across the VMs and can be reassigned as necessary. This makes it possible to run different environments simultaneously and accommodate fluctuating workloads.
From the user's perspective, the VM operates much like a bare-metal machine. In most cases, users connecting to a VM are not aware that they are using a virtual environment. Users can configure and update the guest OS and its applications as necessary and install or remove new applications without affecting the host or other VMs. Resources such as CPUs, memory and storage appear much as they do on a physical computer, although users might run into occasional glitches, such as not being able to run an application in a virtual environment.
The role of hypervisors in virtualization
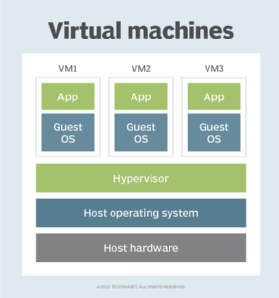
Hosting VMs on a computer requires a specialized type of software called a hypervisor, which manages resources and allocates them to VMs. The hypervisor also schedules and adjusts how resources are distributed based on the configuration of the hypervisor and VMs, including reallocating resources as demands fluctuate.
The hypervisor emulates the computer's CPU, memory, hard disk, network and other hardware resources, creating a pool of resources to allocate to individual VMs according to their specific requirements. The hypervisor can support multiple virtual hardware platforms that are isolated from each other, enabling VMs to run Linux and Windows Server OSes on the same physical host.
Most hypervisors do not require special hardware components. However, the computer that runs the hypervisor must have the resources necessary to support VMs, the hypervisor's operations and the host's own operations.
Most hypervisors fall into one of two categories: type 1 or type 2.
Type 1 hypervisors
Also known as bare-metal hypervisors, Type 1 hypervisors run directly on the physical host machine and have direct access to its hardware. Type 1 hypervisors typically run on server computers and are considered more efficient and better performing than Type 2 hypervisors, making them well suited to server, desktop and application virtualization. Examples of Type 1 hypervisors include Microsoft Hyper-V and VMware ESXi.
Type 2 hypervisors
Also known as hosted hypervisors, Type 2 hypervisors are installed on top of the host machine's OS, which manages calls to the hardware resources. Type 2 hypervisors are generally deployed on end-user systems for specific use cases -- for example, a developer creating a specific environment for building an application or a data analyst testing an application in an isolated environment. Examples of Type 2 hypervisors include VMware Workstation and Oracle VirtualBox.
Process vs. system VMs
VMs are often categorized by the type of hypervisor that manages them or by the type of workloads they support. However, VMs can also be categorized as process or system VMs.
Process VMs
A process VM is a temporary, platform-independent programming environment for executing a single process as an application. The environment provides a high-level abstraction that masks the underlying hardware or OS. A process VM is created when the process starts and destroyed when the process ends. Two common examples of process VMs are Java virtual machines, which run programs compiled from Java, and the Common Language Runtime, which is part of Microsoft's .NET Framework.
System VMs
A system VM is a fully virtualized environment hosted on a physical server that runs its own OS. The VM shares the host's physical resources but provides a complete environment for running applications and services, similar to a physical machine without the overhead. System VMs use a hypervisor to virtualize the hardware resources and make them available to VM environments. Common examples of system VMs include those supported by virtualization platforms such as VMware vSphere and Microsoft Hyper-V.
The benefits of using VMs
Although containers and other modern application technologies have affected VM use, organizations of all sizes continue to deploy VMs extensively because they offer several important benefits. VMs make it easier to manage multiple environments running different OSes and can simplify backups, disaster recovery, new deployments and basic systems administration tasks.
Reduced costs and improved efficiency
Virtualization limits costs by reducing the need for physical hardware systems. Because VMs help organizations consolidate servers and better utilize hardware resources compared with bare-metal deployments, organizations routinely deploy VMs in their data centers to support a wide range of use cases and workloads.
Running multiple VMs simultaneously on a single server reduces the need to spread workloads across multiple servers, which often operate below capacity. Consolidating workloads on fewer servers means fewer physical systems to deploy and maintain. This, in turn, can save capital and operating expenses by lowering associated maintenance costs and the demand for power and cooling.
Simplified IT management and administration
Organizations often deploy VMs to simultaneously run multiple applications that require different OSes and processing power. Examples include running legacy applications alongside other workloads, testing multiple web servers along with small databases, and using the same server to run graphics-intensive gaming software and a customer service database. DevOps teams can also use VMs as part of continuous integration and continuous delivery (CI/CD) pipelines.
VMs provide isolated, self-contained environments that can run different OSes and applications on a single server. Administrators, developers and testers can quickly deploy and manage multiple VMs from a centralized interface on most virtualization platforms, even if those VMs are distributed across multiple hosts. This lets organizations deploy legacy and business applications in the environments they require without dealing with contention issues or needing to purchase multiple servers.
Increased scalability and flexibility
VMs make it easy to scale applications and accommodate fluctuating workloads, which is one reason virtualization plays a key role in cloud computing and systems such as hyper-converged infrastructure (HCI). IT teams can move, copy and reassign VMs among host servers and between on-premises and cloud environments. In addition to improving hardware resource utilization, this makes it easier to scale applications.
VMs are also flexible in that they do not require specialized or hypervisor-specific hardware. However, if the physical hardware must host multiple running VMs, the host computer needs more bandwidth, storage and processing capacity than a traditional server or desktop.
Stronger security
Organizations also turn to VMs because of the extra layer of security they provide against potential threats. Because VMs operate in isolated environments, they provide an additional level of protection against cyber attacks.
VMs also support such features as snapshots and backups, which means that admins can delete, restore or roll back a compromised VM to a recent backup or snapshot. Because the compromised VM is isolated from the host and other VMs, the threat is limited to that VM.
Comparing VMs and containers
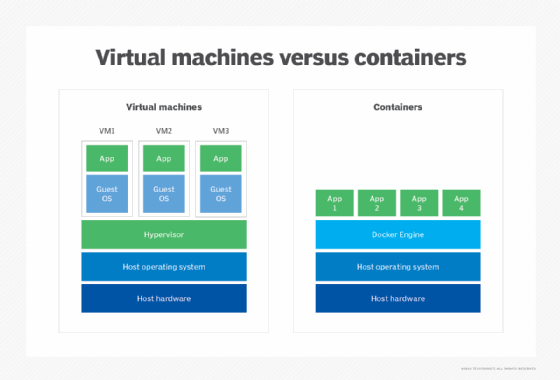
Containers are similar to VMs except that they virtualize only the OS, rather than the rest of the underlying hardware.
Containers include the code, system tools, runtime, system libraries and settings needed to run the containerized applications. Consequently, containers are often used for multiple applications running on the same OS.
Containers are also used for cloud-native, distributed applications and to package legacy applications for increased portability and deployment simplicity. Docker, which entered the market in 2013 as a Linux-based container platform, is one of the leading container options.
The pros and cons of containers vs. VMs
VMs on a physical host can consume unequal resource quantities: One might hog the available physical storage, while another uses little. Thus, IT professionals must balance VMs with available resources, although virtualization platforms ease the process.
Containers have lower overhead than VMs and are much more lightweight. They also boot faster, use fewer server resources and are more portable, making them well suited to modern application designs such as microservices architectures.
However, all containers running on the same host or ported to a different host must support the same OS. VMs, in contrast, can run different OSes and offer a greater degree of isolation, although they can be configured to communicate with each other as necessary. VMs are thus better suited for monolithic applications or for running multiple applications together. They're also handy for legacy applications that require isolated environments.
Can you use both containers and VMs?
Containers and VMs can be used together to provide the best of both worlds. Although this adds overhead, it provides an additional layer of security that containers alone are missing. The combination also makes it possible to deploy infrastructure that can support modern and traditional workloads.
Although most HCI platforms are based on virtualization technologies, many have added support for Kubernetes, which is implemented within the VM structure. As a result, all containerized workloads run in VMs, benefiting from the isolation of VMs while operating alongside traditional workloads.
Setting up a VM
The process used to set up a VM depends on the virtualization platform. Many platforms offer wizards and other features to streamline the process of creating and deploying a VM.
For example, in VMware vSphere, an admin can create a VM from a template or clone or create a single VM from scratch. Included with vSphere is the New Virtual Machine wizard, which walks the user through the process of creating the VM, whether a new one or one based on a template or clone.
Red Hat Virtualization takes a different approach to setting up a VM. For example, to install a Linux VM, the user would take the following steps:
- Create a blank VM.
- Add a virtual disk for storage.
- Add a network interface for connecting the VM to the network.
- Install the guest OS.
- Register the VM with the content delivery network and attach the necessary subscriptions.
- Install any required guest agents or drivers.
Because the process of setting up a VM is specific to the virtualization platform, users should review the platform's documentation before deploying any VMs.
VM management
Using VMs comes with several important management considerations, many of which can be addressed through general systems administration best practices and tools designed to manage VMs.
There are some risks to consolidation, including overtaxing resources or experiencing outages on multiple VMs due to physical hardware failure. Although cost savings increase as more VMs share the same hardware platform, so does the risk: It might be possible to place hundreds of VMs on the same hardware, but a hardware platform failure could take out dozens or hundreds of VMs. Proactively backing up VMs can help mitigate these risks.
VM platform vendors
Multiple vendors offer virtualization platforms. The following are four of the most popular options:
- VMware vSphere is a widely implemented virtualization platform that includes native support for Kubernetes, making it possible to run traditional and modern workloads in VMs. VMware vSphere is highly scalable and can support high-performing applications such as SAP HANA.
- Citrix Hypervisor, formerly Citrix XenServer, is a high-performance hypervisor based on the Xen Project open source hypervisor. Citrix Hypervisor is optimized for virtual app and desktop workloads as well as Windows and Linux virtual servers. Admins can configure policies that restart VMs on another server in case one of them fails.
- Microsoft Hyper-V enables admins to create and manage VMs on Windows. Hyper-V is an integrated component of the Windows Server platform, which simplifies implementations in Windows Server environments. Hyper-V supports both Windows and Linux VMs and includes features for easily moving, distributing or replicating VMs.
- Red Hat Virtualization is an enterprise virtualization platform built on the Red Hat Enterprise Linux OS and the Kernel-based VM (KVM) virtualization module. The platform can support mission-critical applications and resource-intensive workloads and comes integrated with Red Hat OpenStack, OpenShift and Ansible.
In addition to KVM, numerous other open source virtualization products have staked their claims in the VM market, including oVirt and Proxmox Virtual Environment.
Although cloud computing makes extensive use of virtualization, it layers additional technologies onto the platform, such as self-service provisioning and chargeback. For example, in a virtualized data center, IT staff can spin up new VMs based on user demand or a new project. However, in a cloud environment, an end user can provision VMs from a self-service catalog and specify resources without interacting with the underlying physical equipment or requiring the help of an admin.