
Maxim_Kazmin - Fotolia
Enable AMD-V in BIOS to remediate error codes
If admins are experiencing error codes due to AMD-V being disabled, they can easily remediate this issue by entering BIOS and reenabling the virtualization extension.

AMD is one of the more popular CPU vendors and a majority of IT administrators are familiar with the technology. However, some IT admins have come across several issues, such as error codes, associated with the CPU's virtualization feature being disabled. There are several ways admins can enable AMD-V in BIOS, such as pressing a specific key prior to boot or using a Windows installation DVD.
AMD-V should come enabled by default, but it is becoming increasingly common for new systems to arrive with virtualization disabled. In most cases, AMD-V is disabled in the BIOS is because the computer manufacturer opted to disable it.
Use AMD-V for virtualization
Both Intel and AMD provide hardware-level virtualization capabilities. Though both companies build quality CPUs, AMD processors tend to be a more popular choice among admins who are trying to stick to a strict budget.
The most compelling reason for enabling hardware-level virtualization on an AMD processor is to host VMs. For example, some editions of Windows 10 come with Microsoft Hyper-V, which enables admins to create and manage VMs. Windows Server also includes Hyper-V, which requires admins to enable virtualization at the hardware level. Enabling virtualization is also required to run competing hypervisors such as VMware ESXi.
In addition, admins are beginning to adopt virtualization as a security platform. For example, Windows Server's Hypervisor Enforced Code Integrity feature is dependent on hardware-level virtualization.
Address errors related to the AMD-V extension
The most common reason why AMD-V is disabled in the BIOS is because the system's vendor has chosen to disable it prior to shipping it from their facility. It's also possible that a previous user accidentally turned off hardware-level virtualization.
It's usually easy to tell if AMD-V is disabled. For example, admins might see an error code such as VERR_SVM_DISABLE or they might find that the Virtual Machine Management Service -- a component of Hyper-V -- is unable to start. If admins are running Windows, they can use the Task Manager to determine whether they have AMD-V enabled.
To do so, admins must open the Task Manager and then select the Performance tab. This tab contains text indicating whether admins have virtualization enabled -- steps might vary depending on the version of Windows. If admins determine that either a vendor or third-party disabled AMD-V in the BIOS, they must reenable it before they can use any virtualization-related features.
The exact method used to enable AMD-V varies widely depending on the make and the model of the system that admins are configuring. The first step in this process is to boot either the BIOS or the Unified Extensible Firmware Interface (UEFI). This typically involves turning on the computer and pressing a specific key prior to the OS beginning to load. The key varies among manufacturers, but some of the more commonly used keys include F1, F2 and Esc.
However, if admins aren't certain which key their system's manufacturer has designated for UEFI and BIOS access, they can use a Windows 10 installation DVD as an alternative. Admins can also use Windows 8, but the steps are different.
Admins who use a Windows 10 installation DVD will arrive at a screen asking which language they want to install. After choosing the appropriate language, click Next. The following screen displays an Install Now button, as shown in Figure 1. Rather than clicking Install Now, admins must click the Repair your computer link.
_mobile.jpg)
At this point, admins must click on Troubleshoot, followed by the UEFI Firmware Settings button, as shown in Figure 2. Then, admins will see a prompt to restart their computer.
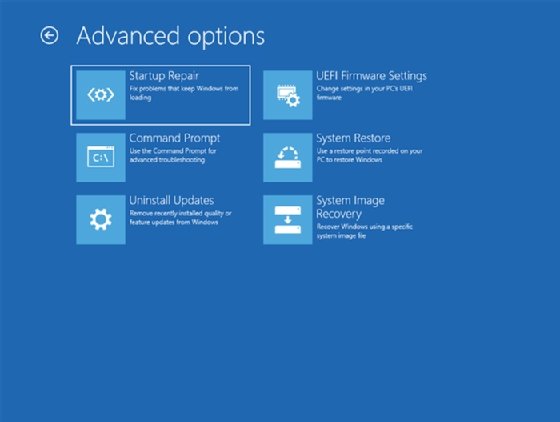
Next, admins must click the Restart button and to reboot directly into the UEFI or BIOS. As previously noted, the steps required to enable AMD-V in BIOS vary widely from one system to the next. In most cases, the configuration utility that admins have booted into will include a series of menus. Often, admins can enable AMD-V by going to the Advanced menu and setting the Virtualization option to Enabled. However, some vendors place the Virtualization option on the System Configuration menu instead.
It's worth noting that the option to enable AMD-V in BIOS might be labeled in a variety of ways. For example, admins might see AMD-V listed as Virtualization, Virtualization Support, Virtualization Technology, AMD Virtualization, SVM Mode or Advanced Secure Virtual Machine Mode. Though the Advanced and System Configuration menus are the most common places to find this option, admins might find the option on a submenu, such as Advanced Configuration or CPU Configuration, or on a different menu altogether.