
freshidea - Fotolia
How to deploy graphics devices using Hyper-V DDA
Admins can map a VM to a GPU with Hyper-V, but they must first complete a few steps, such as prepare the VM and dismount the PCIe device from the host partition.
Windows Server 2016 now includes the ability to perform Discrete Device Assignment in its feature set, a feature which enables IT administrators to map VMs directly to a Peripheral Component Interconnect Express device and gives those VMs exclusive access to the device.
There are three main steps in performing a Discrete Device Assignment of a GPU: Preparing the VM, dismounting the Peripheral Component Interconnect Express, or PCIe, device from the host partition and making the device assignment within the VM. Admins must perform all three of these steps within PowerShell.
Unfortunately, this process can have some ambiguity. Some hardware vendors have additional requirements that go beyond those of Hyper-V. As a result, admins should get in touch with their GPU vendor and determine if the GPU works with Hyper-V Discrete Device Assignment (DDA) and if it must meet any special requirements before deployment.
Prepare the VM
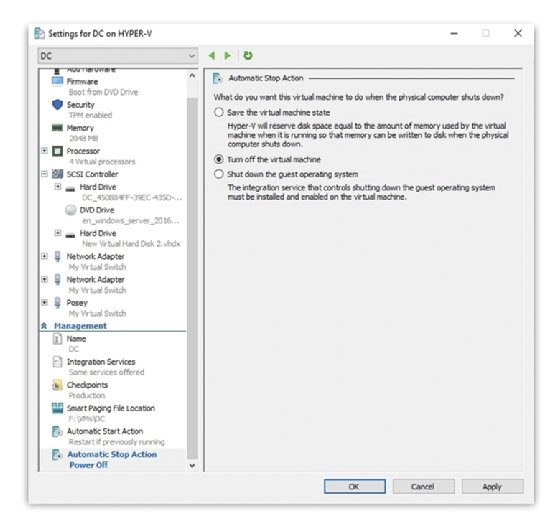
Generally, the only step admins must complete to prepare a VM for a Hyper-V DDA is to set the VM's automatic stop action by selecting Turn off the virtual machine in the Hyper-V Manager platform. You can use a PowerShell command for performing the same action:
Set-VM -Name <Virtual Machine Name> -AutomaticStopAction TurnOff
The GPU vendor might require admins to perform some additional preparatory steps on the VM. These steps can include enabling a CPU's write combining feature, configuring the 32-bit memory-mapped I/O space or configuring MMIO space greater than 32 bits. You can use additional PowerShell commands to perform these steps:
Set-VM -GuestControlledCacheTypes $true -VMName <Virtual Machine Name>
Set-VM -LowMemoryMappedIoSpace 3Gb -VMName <Virtual Machine Name>
Set-VM -HighMemoryMappedIoSpace 33280Mb -VMName <Virtual Machine Name>
Dismount the PCIe device from the host partition
Admins must take two steps to dismount a GPU's PCIe device from the host partition. First, admins must ask the GPU vendor if the GPU uses a security mitigation driver. If the GPU does, they must install it before removing the GPU from the host partition. The dismount command varies depending on whether a security mitigation driver exists.
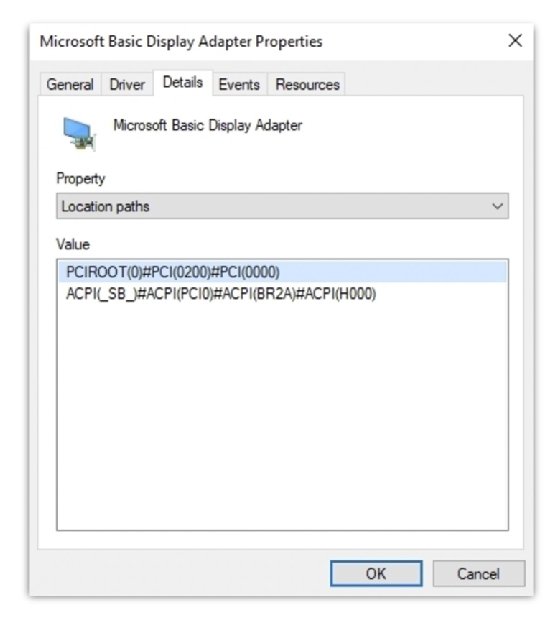
Next, admins must find the GPU's location path by opening the Device Manager in the parent partition, right clicking on the GPU and selecting the Properties command from the shortcut menu. When the GPU properties sheet appears, select the Details tab and then select Location paths from the Property drop-down menu. Make note of the path that references PCI Root.
If admins use a security mitigation driver, they can use this command to dismount the PCIe device:
Dismount-VMHostAssignableDevice -LocationPath $locationPath
Otherwise, they should use this command:
Dismount-VMHostAssignableDevice -force -LocationPath $locationPath
Assign the GPU to the VM
The last step in performing a Hyper-V DDA is to map the GPU to the VM. From the host partition, admins must enter this command:
Add-VMAssignableDevice -LocationPath $locationPath -VMName <Virtual Machine Name>
Afterward, admins can boot the VM and install the GPU vendor's video drivers into the VM.
Dig Deeper on IT systems management and monitoring
-
![]()
How to use ChatGPT with PowerShell to write code for admins
By: Anthony Howell
-
![]()
How to create snapshots for Azure VMs and managed disks
By: Stuart Burns
-
![]()
Running GPU passthrough for a virtual desktop with Hyper-V
By: Brien Posey
-
![]()
GPU virtualization eases system workloads, boosts efficiency
By: Stefani Muñoz