
Tomasz Zajda - Fotolia
Use vCenter maps to get better insight into your environment
Managing a VMware environment can be complex, but a single mapping tool can smooth the process significantly by showing the relationships between objects.
Anyone who has ever managed a VMware environment understands how complex the task can be. It can be a challenge to keep up with all of the VMs, hosts, datastores, networks and other objects. Fortunately, VMware includes a somewhat obscure mapping feature -- only accessible from a vSphere client that connects to a vCenter Server system -- you can use to visualize the relationships between these objects.
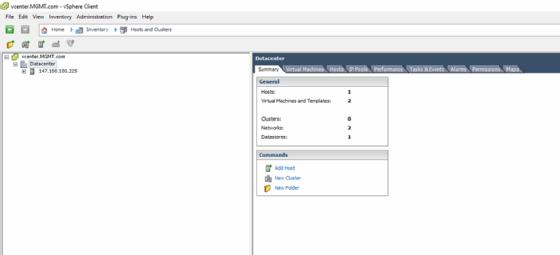
To access maps, log in to your vCenter Server using vSphere Client. Click on an object in the inventory, and select the Maps tab. If you look at Figure 1 below, you can see that a data center object has been selected and that the last tab on the right is labeled Maps.
The Maps screen contains a large open area that displays the selected map and contains an interface that enables you to customize the information displayed on the map. You can see this interface in Figure 2 below.
Looking at the Map Relationships section in Figure 2, the top line of text says Custom Map. Just to the right of the Custom Map text is a down arrow icon. Clicking on this icon gives you the ability to select from four different map types: Virtual Machine Resources, Host Resources, Datastore Resources and Custom Map.
The next section that's displayed is the Host Options section, which contains a series of checkboxes that you can select to display various types of resources on the map. If you want to see which VMs are on each host, you can select the Host to VM checkbox. Doing so causes the client to create a map showing all of the hosts and all of the VMs that vCenter is aware of. A series of connecting lines illustrates which host each VM resides on. Just as you can map the relationship between hosts and VMs, you can also display the relationships between hosts and networks or datastores.
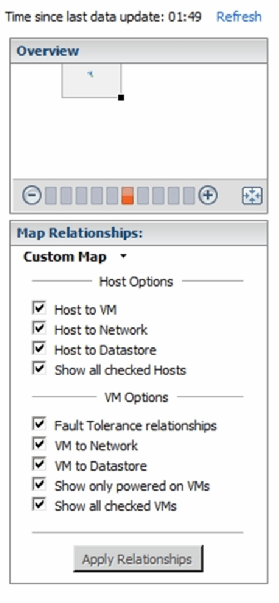
The next section is VM Options, which focuses mostly on VM relationships. Similar to the Host Options section, you can view the relationships between VMs and networks or datastores and opt to display only VMs that are powered on or specifically selected VMs. The ability to display any fault-tolerant relationships that exist for your VMs is another choice available when using the VM Options. Although not shown in Figure 2, vCenter maps also have the capability to display vMotion relationships.
One last feature to take a look at is the Overview section. As shown in Figure 2, the Overview section enables you to zoom in and out of the map that you create, a helpful tool when the map becomes too large due to the number of hosts and VMs selected for inclusion in the map. Be conscious that large maps usually take a long time to render.
Dig Deeper on VMware cloud
-
![]()
Dive into the latest features for VMware Instant Clones
By: Rob Bastiaansen
-
![]()
VMware vSphere monitoring ensures system health, performance
By: Robert Sheldon
-
![]()
Types of Hyper-V scheduler for simultaneous multithreading in VMs
By: Brien Posey
-
![]()
Use these PowerCLI vMotion cmdlets to automate VM migration
By: Dan Franciscus