It's easy to create a VM template that holds a shielded disk, but the process is a little different than creating a traditional VM template. IT administrators should follow specific steps and consider factors such as disk settings and VM type to effectively deploy shielded VMs via SCVMM templates.
Microsoft introduced a few exciting security features for VMs in Windows Server 2016 Hyper-V. One of those features is shielded VM, which protects against a compromised host or fabric.
The shielded VM feature has a BitLocker-encrypted virtual Trusted Platform Module, but a VM using shielded technology can only run on approved virtualization hosts.
The process of creating a new shielded disk to include in a VM template involves preparing the OS disk, running the Shielded Template Disk Creation Wizard, copying the template disk to the System Center Virtual Machine Manager (SCVMM) library and then creating an SCVMM template that contains the shielded disk.
Steps for creating a shielded VM template
Step 1:Prepare the OS disk. Admins must first create an OS disk that they will use in the Shielded Template Disk Creation Wizard.
When creating the template disk, they must make sure it meets all the requirements. For example, the disk must be a globally unique identifier disk and the disk type must be basic -- note that shielded VM uses BitLocker, and BitLocker doesn't support dynamic disks.
A VM using shielded technology can only run on approved virtualization hosts.
The disk must also have at least two partitions. Admins must install Windows Server 2016, Windows Server 2012 R2, Windows Server 2012, Windows 10, Windows 8.1 or Windows 8 and ensure that the OS is generalized using the Sysprep tool.
Step 2:Run the Shielded Template Disk Creation Wizard. Next, admins must prepare the disk to use the shielded VM technology. The wizard will generate a hash for the disk and add the hash to the disk volume. The disk is signed with the certificate specified in the Signature Catalog section.
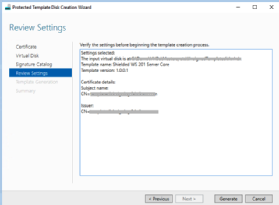
Once the admin has specified the settings in the wizard, it provides a review. Verify that the settings are correct and click on the Generate button to generate the template disk, as shown in Figure A.
Figure A. Verify the settings in the Shielded Template Disk Creation Wizard.
The generation process will enable and install BitLocker on the disk's OS and add the disk to the VHDX metadata. Note that the wizard might take a little longer depending on the size of the disk.
Step 3:Copy the template disk to the SCVMM library. Once the disk is generated, admins should copy the disk to the SCVMM library so they can deploy the shielded disk via SCVMM.
After copying the disk to the SCVMM library share, edit the property of the disk and select the OS installed on the disk. This is just to ensure the disk isn't blank and that it contains an OS.
Once the admin has updated the disk's property, the next step is to click OK and navigate to Library Servers > Library Share > MSSCVMMLibrary > VHDs. In the pane to the right, the disk appears with a small shield icon, which indicates that the disk is using shielded VM technology and that admins can use it for shielded VM deployments, as shown in Figure B.
Figure B. The shielded VM template in the SCVMM library server
Step 4:Create the template in SCVMM. After adding the disk to the SCVMM library server, admins can create a new SCVMM template that includes the shielded VM disk.
It's important to understand that traditional VM templates are different from shielded VM templates because the prepared disk has certain settings that are already fixed and enabled, such as the Unified Extensible Firmware Interface and Secure Boot. The VM also uses Generation 2 technology.
Note that there are some disk settings admins can't configure during the VM template creation process. As with the traditional VM template creation process, the first step is to navigate to the library workspace and click on Create VM Template. Then, on the Select Source page, click Use an existing VM Template or Virtual hard disk stored in the library and follow the onscreen steps.
On the Configure Hardware page, ensure that at least one network interface card is available and configured because only network mediums such as Remote Desktop, Windows Remote Management or other remote management tools can access shielded VMs. Once the VM template is created, admins can deploy the template to the target hosts.
Dig Deeper on IT systems management and monitoring